Showing posts with label halloween. Show all posts

Saturday, September 20, 2014

Under Your Spell

Happy Saturday! This is a super quick Halloween card to make using pre-made shapes and sentiments. I rounded the corners of the textured cardstock. Added the orange net ribbon and some brads. The sentiment is then added on to the top using 3-D foam tape.


All supplies can be purchased at A Scrap 'N Place.

Supplies:

Papers: Orange cardstock, Bazzill (yellow cardstock), Canvas Corp (Haunt It Sampler on White)
Inks: Copic (orange marker)
Accessories: Orange Brads

Saturday, September 13, 2014

Frightfully Sweet

Happy Saturday! I love creating backgrounds using stamps so on this Halloween card I used white cardstock and randomly stamped the background with sentiments and a skull. I then distressed it with orange ink. I love the ribbon raffia. I unrolled some of it to make my double bow then added another strand for the center to hold the bows together. I stamped the sentiment and used 3-D foam tape to give it some dimension.


All supplies can be purchased at A Scrap 'N Place.

Supplies:
Stamps: MFT (Spooky Sentiments)
Inks: Orange and black
Papers: Canvas Corp (Candy Cane on White), white and black cardstock
Accessories: orange raffia ribbon

Saturday, September 6, 2014

If You've Got It

Hi There! Kim here to share with you a fun Halloween card. Fall will be here soon  and that means it's time to get ready for some spook-tacular fun. I put this together with a combination of embossing and die cutting to add texture and dimension. I added the brad on top of the bow and the rhinestones accent the die cut scallop. 


You can find all supplies used at A Scrap 'N Place.

Supplies:
Papers: Canvas Corp (Haunt It Sampler on White, Candy Corn on White), Orange and Black Cardstock, Authentique (Enchanted) 
Tools: Elizabeth Craft Designs (Damask embossing folder)
Accessories: Black rhinestones, orange checkered ribbon

Saturday, September 28, 2013

Treat Bag

What is Halloween without some yummy treats? I made this treat bag to hold some of your yummy treats or better yet a gift bag for teachers and friends.
I used the plaid paper from Authentique's Thriller line and the sentiment is from the sticker sheet. I added a scallop border then accented the border with rhinestones. I pulled everything together with some pretty ribbons and a tag.


Supplies ( All Supplies can be found at A Scrapin' Place):
Papers: Authentique (Thriller Collection plus Detail Sticker Sheet), Cream Cardstock
Accessories: Bazzill Basics Papers (clear rhinestones), Sweet 'n Sassy Stamps (scallop dies), Black Fiber, Orange Ribbon, Melissa Frances pearls

Wednesday, September 25, 2013

A Haunted Easel Card


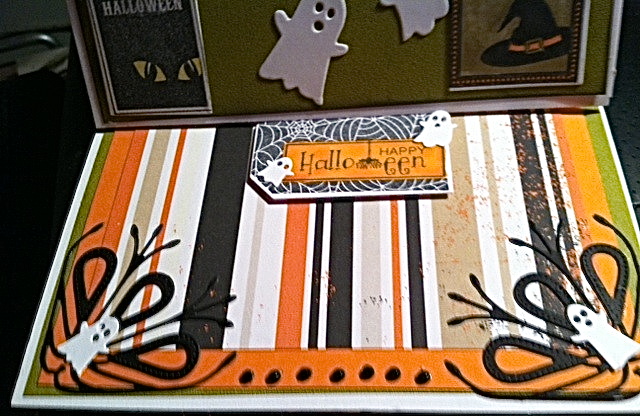
View of full card
close up of card front
close up of bottom


Supply list
Taylored Expressions Totally Tags Halloween
Taylored Expressions Totally Tags Dies
Say it with Bling black Rhinestones Want 2 Scrap
Memento Black Ink
Pierson Corner 98678 Memory Box
Ghastly Ghosts 98750 Memory Box
Ghost Trio 98376 Memory Box
Color Box Chalk Charcoal
Dries clear adhesive
Gelly Roll pen Clear Star
Copic markers
Mounting tape
Orange, White, green and  Designer paper
green Ribbon.

To make a 6 x 6 easel card you start with a piece of paper 12  X 6.  Then you score it at 6  and 8 inches  the long way..  you do a valley fold at 6   inches and a mountain fold at 8.
You will also need a piece of  6 X 6 card stock for you base.. I do all my work on my base piece before mounting  the card portion on my easel part..
I also do the bottom .. except for the piece that is going to hold the easel. After I put the piece on the easel portion of the card.. then I add the part that is going to hold the easel up.
thanks for stopping by .. You can pick up all the supplies for this card at A "Scrapin" Place
Debbie

Saturday, September 21, 2013

Halloween Card

Hello Stampers! I have a card to share with you today. I love the banners on Authentique's Thriller sticker sheet. There are so many fun elements from this one sticker sheet to use. I cut out the hexagons from the Thriller patterned paper to incorporate into the banner on this Halloween card.  The sentiments are from the sticker sheet. I hot glued the shapes to the jute to make sure it holds. I then combined the black glittered paper with the plaid and adhered all the elements onto it. 


Supplies (All Supplies can be found at A Scrapin' Place):
Papers: Authentique (Thriller Collection), Best Creations, Inc. (Black Glitter Cardstock), Cream Cardstock
Accessories: Canvas Home Basics (Tags & Ties), Melissa Frances pearls

Tuesday, September 17, 2013

Halloween card


This is another quick and easy one you can do in about 10 minutes tops that I made for this week's inspiration post at A Scrapin' Place.   I absolutely loved the skull papers in this kit and had to use up every last bit :)


Products used
Happy Haunting paper - Carta Bella
Black card stock
Ivory card stock
Orange cardstock
green brads
Colorbox chalk ink

Saturday, September 14, 2013

Spooky Banner

 Hello Stampers! Halloween wouldn't be complete without some fun decorations. I created the banner using a pre-made blank banner and covered them with pretty Halloween papers.
I used the letters from the Authentique Thriller sticker sheet to spell out the word "Spooky." 


I then popped it onto the individual triangles with 3-D foam tape and the black pearl was from Melissa Frances which  I colored to match the theme. The final details on the banner was to add distressed glitter along the edges.


Once the decorations on the triangle pieces were completed, I used hot glue to adhere them to the black ribbon.  


Supplies (All Supplies can be found at A Scrapin' Place):
Papers: Authentique (Thriller Collection), Paper Accents (Orange Cream Cardstock), Black Cardstock
Accessories: Ranger (black soot distressed glitter), Canvas Home Basics (Tags & Ties), Melissa Frances pearls, Black Ribbon

Tuesday, September 10, 2013

Happy Haloween


Happy Tuesday everyone!  Tanya here with another halloween card.  This is another quick and easy one you can do in about 10 minutes tops


Basically it's a lot of matting with each being about 1/4'' smaller than the last.  I inked the edges with the colorbok chalk ink on everything and then added two layers of ribbon (black and orange).  I then took black cardstock to make the web using Memory Box Web Die, added glue all over the top of the web (you don't have to be too careful because it will help stick to the ribbon afterwards) and then added some stickles glitter.

The sentiment is just something I typed on the computer and printed out on my own

Saturday, September 7, 2013

October 31st

Hello Stampers! I am so happy to be sharing my first post with you as a Bling Girl! I used the Authentique line of patterned papers and sticker sheets to pull my card together.
I started by adhering the orange and patterned paper together then placed the scalloped piece on top. I used Sweet 'n Sassy Stamps scalloped border die then I added some texture to the card with various stitchings. The sentiment is added to the lower portion of the card using 3-D foam tape. The circle on top of the bow is from the Authentique Detail Sticker Sheet.


Supplies (all supplies can be found at A Scrapin' Place):
Papers: Authentique (Thrilling Collection plus Detail Sticker Sheet),  Paper Accents (Orange Cream), Cream Cardstock
Accessories: Black ribbon

Wednesday, September 4, 2013

Happy Halloween


Today my card was made using some fun Stamps and dies by Taylored Expressions,  the stamps and dies are made to match so you can always get a good cut on your cut out images.  When you use these you want to make a templet first and line it up with your stamped image.. I used some removable tape to hold it in place.
The products used for this card are
Savannah Border 98221 by Memory Box
Madera Corner 98221 by Memory Box
Purple, orange, white and black paper
Taylored Expressions Totally Tags Halloween
Taylored Expressions Taylored dies.
Eclipse embossing powder by  Powder Kegs
Versa Mark ink
Color Box Chalk Charcol
dries clear glue
Black Ribbon
Bling
mounting tape.
I started by stamping on  white paper with Versa Mark ink,  and putting embossing powder on the ink and heat setting then cutting the images out.  When you put the templet over the top.. make sure you use some removable tape to hold the dies and the templet in place. .

Thanks for stopping by ...
Debbie