Sunday, November 30, 2014

Lawn Fawn Sunday

Hi there and thanks for stopping by! 
It's Ceal here, hope everyone had a nice holiday weekend and ate plenty of turkey, Today I am sharing  some Lawn Fawn goodies with you.  Love this little owl and there is a coordinating die to go along with it. I used some Lawn Fawn paper  cut with the Die-namics Blueprint 15 and twine. I added a little Canvas Corp clothes pin to finish it off.


Wednesday, November 26, 2014

Happy Thanksgiving to all!
Here is another Christmas Cardinal card. For this card I used a large wood grain background stamp. I sponged for the ink around the cardinal to make it more rustic looking. My favorite part was using the blendabilities markers - just love working with them. I added a little glitter to make it look like snow. Thanks for looking and I hope you have a wonderful Thanksgiving!
Tina

O' Christmas Tree


Hello Ladies and a Happy Thansgiving to you and your families,

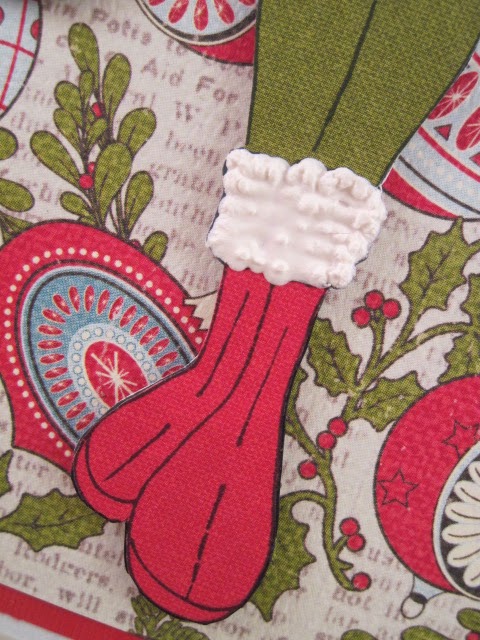
Here is another idea and a very easy one for those of you that haven't started your Christmas cards.  The card is an A2 the background is a red pearlized paper and the embossing folder is Couture Creations Fancy Christmas Tree with a white gossamer ribbon tied around the base.

As I promised last week, below is my recipe for a great Turkey Pot Pie.

Crust:
1 Pepperidge Farm Puff Pastry Sheet

Filling:
1/3 c butter or margarine
1/3 c chopped onion
1/3 c all-purpose flour
1/2 t salt
1/3 t Herbes de Provence
1/4 t pepper
1 c of chicken broth
1/2 c white wine
2/3 c milk
2 1/2 to 3 c shredded turkey or chicken
2 c of frozen mixed vegetables, thawed
1 egg & 1 t of water

Heat oven to 425 degrees F.  Thaw puff pastry out as directed on package.

Melt the butter in medium sauce pan over medium heat.  Add onion; cook 2 minutes or until tender.  Add the flour, salt, herbs de provence, pepper; stir until well blended about 2 minutes.  Gradually store in the wine, broth and milk, cooking and stirring until bubbly and thickened.

Add turkey and mixed vegetables; mix well.  Remove from heat.  Spoon turkey mixture into an oven safe dish, cover with the puff pastry.  Beat egg with teaspoon of water and brush over the puff pastry, this will give it a nice golden brown top to the puff pastry.

Bake at 425 F for 30 to 40 minutes or until crust is golden brown.  Let stand 5 minutes before serving.

6 Servings

 This recipe is adapted from The Pillsbury Company.

Tuesday, November 25, 2014

Happy Holidays from a 'Tartan Miss'

Hi Everyone

Michelle here from Lady of Leisure Ink - thank you Terri for having me.  My card today is probably one of my very favorite, probably because it uses one of the new Prima dolls, but also because I love this Authentique 'Believe' paper.

 
How cute is she dressed in her tartan outfit?  The hat is actually part of the set included with the Prima 'Dog Treats' stamp set, and the bag is from the Prima 'Boutique Set'.  What do you think of her 'fur' trimmed boots?


Thanks for stopping by today.

Michelle

Monday, November 24, 2014

Sunday, November 23, 2014

Shimmering Leaves

Hi there, It's Ceal here to share with you today. 
With this being the week of Thanksgiving we reflect on what we are grateful for. I am grateful for YOU, our customers and blog readers. I hope you have a Happy Thanksgiving!
My card uses the stitched leaves from lawn Fawn, I cut them out using watercolor papers and after I painted them I embossed them to give them the shimmer they have. 

Saturday, November 22, 2014

MIXED MEDIA CHRISTMAS CARDS!

THESE FABULOUS CARDS BY MAYA ROAD ARE LOADED WITH MIXED MEDIA!!!
METAL EMBELLISHMENTS, COOKIE CUTTERS, DOILIES, GLASS PINS, GLASS PENDANTS, BRASS PIECES,ANTIQUE RIBBONS, STICKERS, GORGEOUS PAPERS & BLING-BLING-BLING!!
EACH CARD IS COMPLETE WITH A POP-UP INSIDE THE CARD AS WELL...INCLUDES ENVELOPES. (we will draw for a couple extra cards during each class!)
ALL FOUR for $18.00
CLASSES are 10:00 a.m.  &  7:00 p.m. There are still spots open in both classes.. if you are interested just e-mail or call the Store and leave a message!

Friday, November 21, 2014

AWESOME SNOWMAN CONTEST!

CHECK OUT OUR LATEST CONTEST!
Michelle made up the cutest snowman kits for the store, $3.99 each. Purchase one - decorate it - Bling it up in your own style - bring it to the Store and enter it into the contest. On friday December 12th we will vote for the winner. The winner will go home with this AWESOME LAYOUT & a $25.00 GIFT CERTIFICATE!


Thursday, November 20, 2014

Distressed Christmas Tree

I am back with my final Christmas card for you.  I used the Couture Creations embossing folder again, I cut the tree out and did some distressing with Tim Holtz Distress ink, added some crystals, a star and Ribbon and of course paired it with some paper from Atuthentique.  Out of all the cards I made for Christmas I like this one best, my hubby says it is "not me" but I love it!
~Stephanie

Wednesday, November 19, 2014

Christmas Card Lightbulb branch


Hello Ladies!

The boss was happy with last weeks post so I get to do this again.  Yahoo!  This weeks card is a little more intricate and certainly worth the time.  The white card is a 5 x 7 with green flocked or velvet paper and a strip of white, the die used is Memory Box's Lightbulb Branch #98941.  I fussy cut the lights using scraps of blue, red, green and yellow.  I then used Stickles Crystal over the lights to give it a little bling.  The Merry Christmas stamp is embossed in Wow's Platinum Sparkle, which by the way I love these embossing powders.  I hope this was inspirational to all of you that haven't started your Christmas cards or if your looking for that special card for a special someone.

Next week I'll be posting a Turkey Pot Pie recipe guaranteed to make your family smile and a great way to use up some of the left over turkey.  In the meantime, remember this quote "Not my circus, not my monkey's" it made me laugh and I hope you will too.

I'm off to the mountains ski season is upon us!

Tuesday, November 18, 2014

Christmas Cards from Scraps

Hi Everyone

Michelle here from Lady of Leisure Ink - as always Terri thanks for having me.  Today I have two cards made up from leftover scraps of paper.

I saw this card on Pinterest, and loved how simple it was.  Here is a link to the original card http://www.scrapbook.com/gallery/image/card/4079127.html .


I used my Silhouette Cameo to cut out the date and the holly leaves, and then used sequins for the berries.


For my second card I used strips of patterned paper to weave a colourful background for the heart die (from Memory Box).


Here is a close-up and a look at the sentiment inside.


I hope you liked my projects this week - see you next time.

Michelle

Sunday, November 16, 2014

Snowy Shaker

Happy Sunday!
It's Ceal here to share a shaker card with you. Shaker cards are easy to make and so fun!
To make my card I started with an A2 sized base and a mat cut 4 X 5 1/4. I used a Snowflake die from Sweet 'n Sassy to cut out my window for the shaker, next I cut a piece of acetate to cover the window and added some foam tape to the back. For the "snow" I used some sequins along with some Sampendous snow glitter. You can find all these supplies at A Scrap N Place and if not, terri will order them for you.

Saturday, November 15, 2014

Tis The Season

This is Kim with another CAS Christmas card to share today. I embossed the white cardstock with Provo Craft's snowflake die. I then die cut the ornaments using the Penny Black ornament die. I accented the ornaments with Stampendous' red sticky dots and the glitter dots are done using a small hole punch and the silver glitter paper. I popped the ornaments onto the embossed cardstock using 3-D foam tap.


Friday, November 14, 2014

MONDAY'S CARD & COFFEE


This week's card is made using our new Sizzix lamppost die & embossing folder with distressing & metallic cardstock. Stampendous fragments and sheer wired ribbon along with pearls & shiny gold  ribbon make this dimensional silver & gold card one of a kind!
Make this card and enjoy a dessert & beverage. Monday November 17th @ 10 a.m. 2:00 p.m. & 7:00
$5.00

Thursday, November 13, 2014

Embossing and Lace

Happy Thursday everyone, I am back with a sweet Christmas note card for you.  Today I am using this sweet stocking die cut by Poppy stamps, paired with paper from Authentique, some lace and twine.  I punched out 2 ovals and embossed the one panel with my swirls embossing folder from Hero Arts.
Stephanie

Wednesday, November 12, 2014

Fall card

Good Morning,
I hope that everyone is staying warm on this very cold Wednesday. I guess I am still in the Fall/Thanksgiving mood so here is my creation for the week. I tried using liquid pearls for some sparkle. The pumpkin was a stamped on white paper and than I used a die cut to punch it out - same with the leaves. It is a very simple card but very fun to make. Thank you for looking and I hope you have a warm safe day!
Tina Smith

Easy Christmas Card


Hello Ladies!

Welcome to my very first blog and it has been quite an experience for me.  For those of you that haven't met me I am the newest member of The Scrap N Place, I found this little gem of a store in August with my mom, being from Wisconsin we don't have anything like this and we proceeded to spend and spend.  I brought in a several of my cards that I made and things haven taken off from there, I work at the store a couple of days a week, sell cards and will be teaching my first class for Scrap N Place on November 19th.

The card above is  simple and elegant, it is an A2 card the white has been pearlized with the Prima Color Bloom Pearl White, red flocked or velvet poinsettia paper and Merry Christmas was embossed with WOW Red Glitter EP.

I will have a new card for you every Wednesday for the next six weeks.  If you haven't been to the store recently I invite you to come in and introduce yourself and I look forward to meeting and working with you.


Tuesday, November 11, 2014

No Peeking Under The Christmas Tree

Hi Everyone

Michelle here from Lady of Leisure Ink.  Of course I just had to play with one of the new Prima dolls that Terri has in store, along with the beautiful 'Believe'  Christmas paper by Authentique, (for this project I used the 6x6 paper pad.)


Here are a few close-ups of the card.


Don't you just love the sequin ornaments?

Thanks for taking a peek at my project, and as always thank you Terri for letting me play over in your space - see you next time.

Michelle

Sunday, November 9, 2014

Let It Snow


Happy Sunday!
It's Ceal again to share anther card with you. Well we finally have snow in our forecast, so I thought it would be appropriate to share this quick and easy card using these cute stitched snowflakes from Lawn Fawn, teamed up with this gorgeous BoBunny design paper.  The greeting is from a Lawn Fawn set critters in the Arctic. You can find these and more at A Scrap N Place and like always if they are not in stock, terri will get them for you just ask.
On the centers of a couple of the snowflakes I added some bling, but not rhinestones, Sequins! Why sequins you ask? they are all the rage and they give your card bling and will not cost a dime extra to mail it.

Saturday, November 8, 2014

Jingle All The Way

Hello Stampers! This is a quick CAS Christmas card to create. I used a Penny Black ornament die to cut out the ornament shape. I then added rhinestones to accent it. The cream cardstock is stitched using a zigzag stitch then I stamped the sentiment and added the strings to pull it all together.


Friday, November 7, 2014

CASUAL FRIDAY'S COMING!!!

Michele is teaching her gorgeous Pinecone card & this beautiful bell shaker card this coming Monday at 10:30 a.m. Class cost is $12.00 YOU WON"T WANT TO MISS THIS ONE!!! Call or e-mail to reserve your spot.

Thursday, November 6, 2014

Merry Christmas

Stephanie here, back with another CAS Christmas card.  This week I am using some easy die cuts from a sheet of Authentique  punch outs.  I love making a card for these gems, no stamping, or embossing etc.  I paired the punch outs with coordinating designer paper added a little sewing on my machine and a few crystals and Viola' a quick and easy card.  Have you started to work on your Christmas cards?
Stephanie

Wednesday, November 5, 2014

Christmas Sleigh

Hello,
Well I have put the dolls aside for this week and I am starting to think about my Christmas cards. I used a back ground wood stamp and cut it out to make the sleigh. The only Christmas stamp that I could find that would fit in the oval was the tree but there are so many other possibilities that you could try. Thanks for looking and have a great rest of your week. Tina Smith

Tuesday, November 4, 2014

Cabrini Ornament Cards (2 ways!)

Hi Everyone

Michelle here from Lady of Leisure Ink (can you believe Terri let me back - LOL!)   Well, it is good to be back in blogland after having a break for the month of October - with guests visiting from the UK and a trip to Hawaii, the time has certainly flown by.

I have two Christmas cards to show you using this pretty  ornament die from Memory Box, and the 'Believe' Christmas paper from Authentique.  Here is the first card.


I loved choosing the different papers to piece together the ornament,

Here is the second card - it's a shaker card.


Here is a closer look at the gold sequins in the shaker part of the card.


There area bunch of tutorials available on YouTube for shaker cards, and Terri has lots of pretty sequins for you to play with.

Thanks for stopping by today.

Michelle

Monday, November 3, 2014

CARD & COFFEE "JOY"

These dimensional wood blocks are too fun all "blinged" up with Christmas papers,distressing, shimmery ribbon, silver ink & gems! Enjoy a dessert & drink all for $5.00

Sunday, November 2, 2014

Lawn Fawn Sunday


Happy Sunday 
Today I am playing with Lawn Fawn. They have released some of the cutest sets AND Terri has them! If she has sold out she can order them for you.
The set I used is "Joy to the Woods" and it was so fun to color up with my Copic markers.
I also used the Stitched Hillside borders, how fun! and this awesome design paper "Snow Day" I just love the way it looks like it's snowing in the woods.
Be sure to stop in and check out the latest Lawn Fawn.

Saturday, November 1, 2014

Happy Holidays

Happy Saturday! Kim here with another quick Christmas card. I embossed the red cardstock and matted it onto a shimmery black cardstock.
I used the Christmas ornament dies from Penny Black to cut out the shapes. I then used gray paint for the base then went over it with stickles. The ornaments are adhered to the card using 3-D foam tape.