Morning friends, long time no see. I hope you had a wonderful Christmas season and praying that your New Year has started off well. I have a sweet little Valentine for you today, this is one of my favorite holiday's to create cards for. I used this sweet little bear from Penny Black Stamps, I colored with copic markers the paper is from Authentique and the little die cuts are called Love Buds from Penny Black. All the supplies are available at A Scrap-N-Place.
Hugs,
Stephanie
Showing posts with label Penny Black. Show all posts
Thursday, January 15, 2015
Saturday, November 15, 2014
Tis The Season
This is Kim with another CAS Christmas card to share today. I embossed the white cardstock with Provo Craft's snowflake die. I then die cut the ornaments using the Penny Black ornament die. I accented the ornaments with Stampendous' red sticky dots and the glitter dots are done using a small hole punch and the silver glitter paper. I popped the ornaments onto the embossed cardstock using 3-D foam tap.
Saturday, November 8, 2014
Jingle All The Way
Hello Stampers! This is a quick CAS Christmas card to create. I used a Penny Black ornament die to cut out the ornament shape. I then added rhinestones to accent it. The cream cardstock is stitched using a zigzag stitch then I stamped the sentiment and added the strings to pull it all together.
Saturday, November 1, 2014
Happy Holidays
Happy Saturday! Kim here with another quick Christmas card. I embossed the red cardstock and matted it onto a shimmery black cardstock.
I used the Christmas ornament dies from Penny Black to cut out the shapes. I then used gray paint for the base then went over it with stickles. The ornaments are adhered to the card using 3-D foam tape.Thursday, September 18, 2014
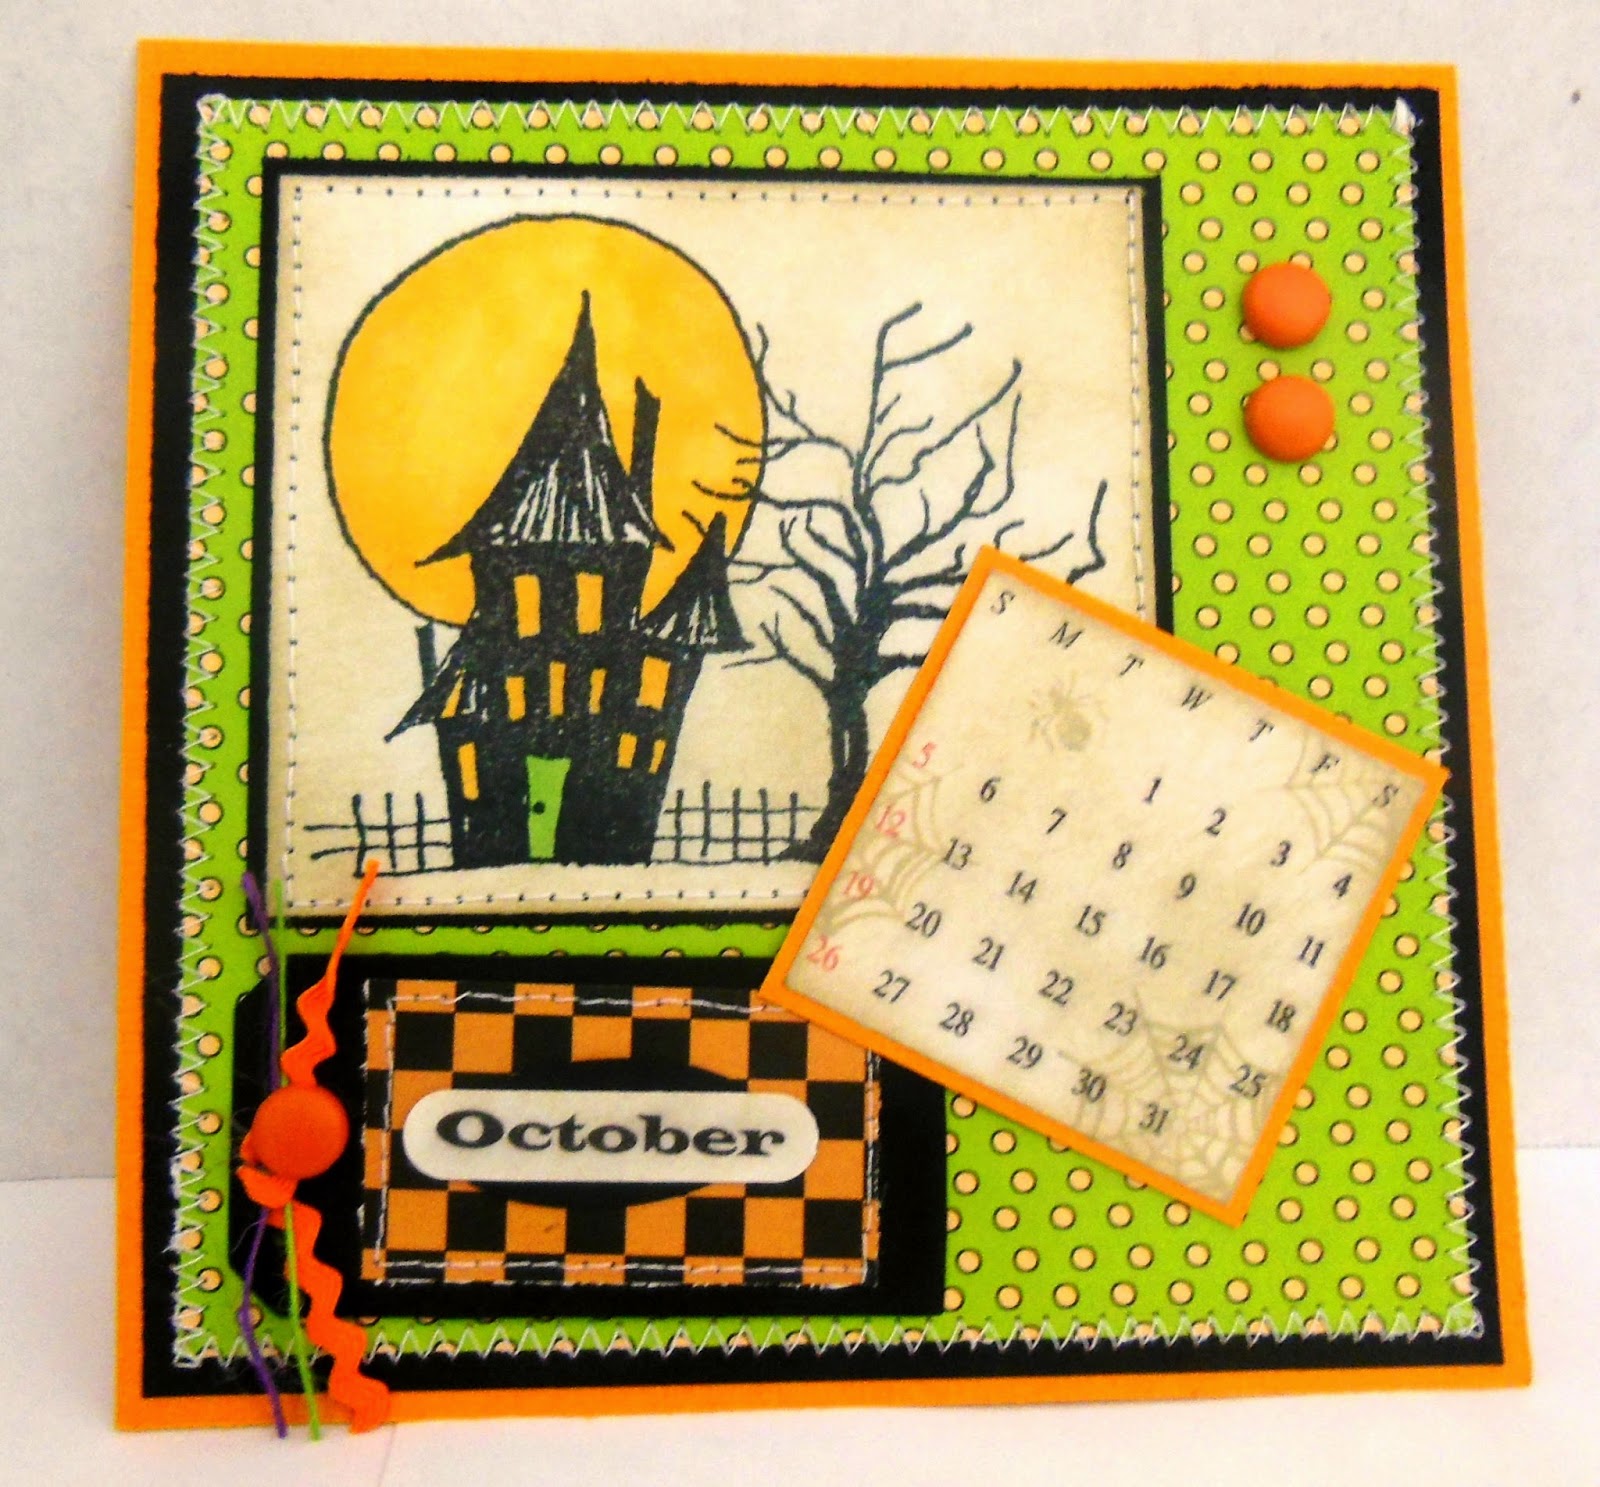
Calender Page
Hello, Stephanie here, I wanted to make something besides a card with this Haunted house by Penny Black so I decided on a calender page. I colored with copics and the paper is by Scribble Scrabble- just love the bright colors. All supplies can be found at A Scrap-N-Place.
Sunday, August 3, 2014
Birds of a Feather
Happy Sunday!
It's Ceal to share one more card made with this Cheery Lynn Primitive Birdhouse die.
I used some of the Harmony collection papers from Authentique. I love this line because it has large print on one side and the smaller print for card making on the other.
This time I gave some texture to my birdhouse by running it through a faux wood embossing folder. I also added the birds on a line die from Penny Black. I felt it needed something in he right corner so I added a sentiment on vellum and then stitched it to my card
Sunday, June 15, 2014
Christmas Dad
Happy Fathers Day to all you Dad's out there!
It's Ceal here sharing tag with you today. We are still celebrating Christmas in June but with Father's day being today I just had to make something with a guy on it. So I used Andrew from C Thru The Woods and made a Christmas tag.
I used Authenque and Basic grey papers and a die from Penny Black
Thanks for looking
Wednesday, June 4, 2014
Watercolor Takes Over the Poppies!
I have to apologize for not posting my usual Wednesday post last
week. My mom was put in hospice week before last and she died on Monday
(Memorial Day). I've been out of town a lot and distracted when I
wasn't. Top that off with a car breakdown on my way to Denver last
week...a permanent breakdown...and you'll get a picture of the last
couple of weeks for me.
Enough of that...here's a new card for you.
This
was definitely a delight to make! I've taken the Watercolor for
Cardmakers class at Online Card Classes recently and watercolor was
definitely on my mind for this one. And I used the same Penny Black
stencil and stamp that I've been using this month.
For
this I inked the stencil with Distress Inks...Spun Sugar, Worn
Lipstick, and Picked Raspberries. I just kinda smeared the colors on
the pads all over. Then I spritzed it really good and put my paper
down on it and allowed it to take up the color. A couple of seconds is
all you need. Then I blew it dry with my heat gun.
I
used the stamp positioner to position the stamp over the flowers,
stamped in versamark, and embossed in bright gold embossing powder. A
pale pink card made the most impact for the background so that's what it
got!
The greeting is stamped in Picked Raspberries and layered on gold glitter paper.
Supplies:
Pink and white cardstock
Penny Black stamp and stencil
Versamark ink and bright gold embossing powder
Distress inks
Wednesday, May 21, 2014
Poppies X Watercolor
So, I've been participating in the Watercolor for Cardmakers class with Online Card Classes. I have done quite a few cards with some different types of techniques, but I decided to do a couple with the Penny Black Poppies that I have been working with. This is one of them.
The white panel is stamped with the poppies image in Memento Black, which doesn't run with water.
Next, I masked the poppies and leaves by "painting" them with rubber cement. I didn't have any masking fluid and rubber cement was available.
Next comes the watercolor. I used my regular tube watercolors. You could use Crayola pan watercolors if you like...or reinkers diluted with water...or distress inks...whatever. I took ultramarine blue and neutralized it with a touch of orange, and brushed 4 swipes with a wide watercolor brush. I let it dry and rubbed off the rubber cement. The flowers were painted with yellow and red...just very rough brush strokes...and the leaves with a green blend that was on my palette. You can't be too persnickety with this technique!
Supplies:
Cardstock in white and yellow
Memento ink
Watercolors
Ribbon by May Arts
The white panel is stamped with the poppies image in Memento Black, which doesn't run with water.
Next, I masked the poppies and leaves by "painting" them with rubber cement. I didn't have any masking fluid and rubber cement was available.
Next comes the watercolor. I used my regular tube watercolors. You could use Crayola pan watercolors if you like...or reinkers diluted with water...or distress inks...whatever. I took ultramarine blue and neutralized it with a touch of orange, and brushed 4 swipes with a wide watercolor brush. I let it dry and rubbed off the rubber cement. The flowers were painted with yellow and red...just very rough brush strokes...and the leaves with a green blend that was on my palette. You can't be too persnickety with this technique!
Supplies:
Cardstock in white and yellow
Memento ink
Watercolors
Ribbon by May Arts
Wednesday, May 14, 2014
A different way to do flowers
Here's a different technique for using the Penny Black poppies...
For this card, I stamped the poppies (I omitted the tall poppy on the left side of the stamp) with versamark and embossed black. Now the paper I used is the reverse side of the green script from a couple of weeks ago. Then I used prismacolor pencils to color the poppies. I wanted to maintain the translucency and see the writing thru the color.
The stamped panel is mounted on ivory then on an avocado green card base. Twine in avocado green makes the bow and there's a sprinkling of greenish-tannish pearls across the front.
Supplies
Cardstock in Avocado green and ivory
Designer paper is Avignon by 7gypsies
Twine by May Arts
Pearls by Zva Creative
For this card, I stamped the poppies (I omitted the tall poppy on the left side of the stamp) with versamark and embossed black. Now the paper I used is the reverse side of the green script from a couple of weeks ago. Then I used prismacolor pencils to color the poppies. I wanted to maintain the translucency and see the writing thru the color.
The stamped panel is mounted on ivory then on an avocado green card base. Twine in avocado green makes the bow and there's a sprinkling of greenish-tannish pearls across the front.
Supplies
Cardstock in Avocado green and ivory
Designer paper is Avignon by 7gypsies
Twine by May Arts
Pearls by Zva Creative
Wednesday, May 7, 2014
All the best to you...
I'm here on this fine cloudy cool Wednesday morning with another project for you to try. I'm continuing to use the same Penny Black stamp and stencil for my projects this month.
This card was done with only the stencil. I started by attaching my stencil to the sheet of aqua paper with a bit of washi tape. I used that because it comes off of the paper without damaging it! Then I used a versamark pad to ink the paper in the openings of the stencil. You have to do quite a bit of tap-tap-tapping to get an even coverage. Then, because the stem lines are pretty fine, I used a versamark pen to make sure that I got the stems and the tips of the leaves. After taking the stencil off the paper I embossed with white embossing powder.
The variations in shading behind the flowers was created by sponging matching ink onto the paper. A sentiment, some pearls, a white mat and attaching to a card of the same color as the top layer completes this simple, pretty card. I used a hexagonal punch to create the points on the sentiment layer, which is attached with dimensionals.
Supplies:
cardstock in aqua and white
inks: versamark and black
pearls by Zva Creative.
Friday, May 2, 2014
"Find me next a poppy posy..."
That's a quote from Thomas Moore, for those of you literary types. ;)
Terri asked me to work with a lovely Penny Black stamp and stencil this month, so here's the first of my creations using the materials I chose to work with...and with the lovely stamp. I'm going to have a lot of fun with this one! I have several cards planned...and they're all everyday type cards.
Instructions: Stamp the poppy stamp on vellum with versamark ink and emboss in black. Color the back side of the vellum with markers. I used water-based markers and heat-dried them so that they wouldn't smear. Mount the vellum on the designer paper and the designer paper on a black mat. Add ribbon and bow (I used the Bow-Easy to make the bow). The greeting is done in black embossing as well and attached with twine.
Hint: Do you need black twine and you only have natural? Use a permanent marker, like your Copics or a Sharpie, and color it! Easy-Peasy!
Hint the second: Is your tag punch a bit too short for your sentiment? Cut a strip of paper exactly the width of your punch...for my punch it was just under 5/8 inch wide. Then take a look at the pictures on this blog post to see how to punch the two ends separately.
Supplies:
Vanilla and black cardstock
Vellum
Designer paper is Avignon by 7gypsies
Stamp is by Penny Black
Ribbon by May Arts
Tag punch is by Martha Stewart
Sentiment is by Stampin' Up
Terri asked me to work with a lovely Penny Black stamp and stencil this month, so here's the first of my creations using the materials I chose to work with...and with the lovely stamp. I'm going to have a lot of fun with this one! I have several cards planned...and they're all everyday type cards.
Instructions: Stamp the poppy stamp on vellum with versamark ink and emboss in black. Color the back side of the vellum with markers. I used water-based markers and heat-dried them so that they wouldn't smear. Mount the vellum on the designer paper and the designer paper on a black mat. Add ribbon and bow (I used the Bow-Easy to make the bow). The greeting is done in black embossing as well and attached with twine.
Hint: Do you need black twine and you only have natural? Use a permanent marker, like your Copics or a Sharpie, and color it! Easy-Peasy!
Hint the second: Is your tag punch a bit too short for your sentiment? Cut a strip of paper exactly the width of your punch...for my punch it was just under 5/8 inch wide. Then take a look at the pictures on this blog post to see how to punch the two ends separately.
Supplies:
Vanilla and black cardstock
Vellum
Designer paper is Avignon by 7gypsies
Stamp is by Penny Black
Ribbon by May Arts
Tag punch is by Martha Stewart
Sentiment is by Stampin' Up
Wednesday, April 30, 2014
Poppies for Memories
Here's another card made with the Penny Black poppy die...this time with colored papers instead of stamping. I added a touch of shading to the flowers...unfortunately it isn't as evident in the photo as it is in real life!
Just a note about using vellum on your cards. Most adhesives show through! Bummer! So I've learned to put my adhesives behind the design elements on the front. So dimensional foam is behind the flowers and banner.
Supplies
White cardstock for the card base and greeting
Reminisce patterned paper for the card front
Vellum for the banner
Red and avocado cardstock for the flowers
Twine from May Arts
Pearls from Zva Creative
Just a note about using vellum on your cards. Most adhesives show through! Bummer! So I've learned to put my adhesives behind the design elements on the front. So dimensional foam is behind the flowers and banner.
Supplies
White cardstock for the card base and greeting
Reminisce patterned paper for the card front
Vellum for the banner
Red and avocado cardstock for the flowers
Twine from May Arts
Pearls from Zva Creative
Wednesday, April 16, 2014
Penny Black Garden...
Penny Black has some beautiful options...with a stamp set called Blooming Garden and this die called Field of Dreams. For this image, I colored the stamp with markers and stamped on white cardstock, then cut with the die. It cuts RIGHT on the edge of the image. Beautiful results!
I like this asymmetrical layout with this paper. It has become a popular layout online recently.
Supplies:
White Cardstock
Patterned paper from Authentique...Promise Two
Poppies stamp and die from Penny Black
Inks and greeting from Stampin' Up
Pearls from Zva Creative
I like this asymmetrical layout with this paper. It has become a popular layout online recently.
Supplies:
White Cardstock
Patterned paper from Authentique...Promise Two
Poppies stamp and die from Penny Black
Inks and greeting from Stampin' Up
Pearls from Zva Creative
Thursday, March 13, 2014
Easter Lambs
Here today with an easy card for you. I used the postcard like image from the Graphic 45 paper-Sweet Sentiments Collection (All My Love). The background paper is found on the flip side of the postcard images. The die is from Penny Black, I added some lace and a blue ribbon. All items can be found at A Scrap-N-Place.
~Stephanie
~Stephanie
Saturday, October 5, 2013
A Joyous Christmas
Hi There! It's time to think about getting ready for your Christmas projects. I made this card using Penny Blacks new Holly Berries die. I used Copic markers to color in the hollies and berries after I die cut it. I added an extra sprig and used wet glue to keep it together. I embossed the solid cardstock to give it some texture and the hollies and berries were adhered to the card using 3-D foam tape.
All supplies can be purchased at A Scrap 'N Place:
Papers: Authentique Paper Collection
Accessories: Freckled Fawn (rhinestone), Organza ribbon
Tools: Provo Craft (Swiss Dots embossing folder), Penny Black (Holly Berries die)
Labels:
Authentique,
Authentique Joyous,
Christmas,
Dies,
Freckled Fawn,
Kim,
Penny Black,
Provo Craft
Subscribe to:
Posts (Atom)