Showing posts with label Debbie. Show all posts

Wednesday, January 29, 2014

Heart Plant


This card challenged me because I wanted to use the hearts and flowers.
Supplies
My Besties Die cut hearts
Dienamics Rustic hearts
memory Box Quinn Flourish
Orchid Branch Memory Box
Couture creations Celebrate
Black Paper
Pink Paper
Designer Paper
White and Black Brads
Black and white ribbon
Bling.

I started the card by embossing the background with the Celebrate embossing folder,
Then I cut out the dies on red paper and embossed using a Sizzix embossing folder.
I attached the hearts with brads so you can move them around..
and added some designer paper as a belly band on the bottom..
thanks for stopping by
Debbie 

Wednesday, January 22, 2014

Love Grows Here


Todays card was made with using some fun dies and  Stamps… love the dies that are made to match stamps so When I saw they  had a set up stamps to match the dies.. long story short I had to order them.

Supplies
My Favorite Things Stamps Home Spun Hearts
Die-namics Rustic hearts
Spellbinders Radiant Rectangles
Memory Box Precious Hearts
Red Ribbon
Black Ribbon
Distress Inks
Barn Door
Festive Berries
Evergreen Bough
Victorian Velvet
White paper
Red paper
Black paper
Designer
Black Memento
gems

I started by stamping the hearts on white paper with Distress Inks.  and using the dies to cut out the hearts. .. the stems I cut out with the scissors.. then I mounted on red paper cut out with a spellbinders dies and added gems and designer paper
Thanks for stopping by
Debbie


Wednesday, January 15, 2014

Valentines gift card holder

today for A Scrap N Place in Co.. I made a gift card  … The gift card holder was inspired by one on Splitcoast … This is a pop up gift card folder..

Supplies 
memory box Macarena Corner
Die-namic rustic hearts
circle spellbinders dies
Red ribbon
Red Thread
gems Alpha Stamp
Distress Ink Victorian Velvet
Pink paper
designer paper
score pal
red miracle tape

to do this gift card holder the best thing is to go to split coast stampers.. because they have a tutorial that is so easy to follow… and the I just love how you can use the die-namics dies in  so many fun ways.
Thanks for stopping by
Debbie 

Wednesday, January 8, 2014

Love Note


I hope everyone .. had a wonderful Christmas and New Years… But are you ready for Valentine's Day.. if not or even if you think you are .. you need to visit a Scrap N Place to get some really awesome dies and paper to use on the card or other gift you are making for that special someone.
Supplies
Dies
Memory Box Gwyneth Flourish
Memory Box Fabulous Phlox
Quick Kuitz heart doily
Dienamics Rustic hearts
My Besties Die Cuts .. Love
Cheery Lynn Designs Mini Flourish
Other
Mini Bags Canvas Home
alphabet stamp…U
Memento Black Ink
Victorian Velvet Distress Ink
Black Ribbon
Couture Creation Embossing folder Celebrate
Black paper
Red Paper
Designer Paper
White Paper
Circle Clip
black Gem  Eva Creations
White memories die ink

The card is a six by Six square…
I layered the designer paper with black.. on a white background.. the added my dies.. the envelope I colored with distress ink using a sponge.. and using one of the hearts from dienamics as a design to go around.. the hearts on the envelope where put thru the embossing folder.. inside the envelope is just a little note made with some dies and a stamp..
Thanks for stopping by
Debbie 

Wednesday, November 27, 2013

Dying for Christmas


Today I made a card with out using any images or stamps… that is something I just normally do not do..
Supplies
Dies
Memory Box Macarena Corner
Impression Obsession Merry Christmas
Poppy Stamps Giovanna Snowflake
Spellbinders Opulent Oval.
Paper
designer
red
White
Green
Ribbon
pearls Eva Creative
Memories White Dye ink
Sizzix embossing folder  Sugar and Stary night

this is  a basic 6 X 6 card with a white base…layered paper and then added die cuts… a fast and easy Christmas card..
Stop by A Scrap N Place for all the supplies.. and happy Card making
Debbie 

Wednesday, November 20, 2013

Christmas Pocket card


Today's card was inspired by one I saw on Facebook from Charmed Cards and Crafts.  (please click on link for tutorial.)
Supplies
White card stock
red card stock
green card stock
white tags.
designer paper
Red ribbon
Green Ribbon
Dies
Cheery Lynn Merry Christmas
Poppy Stamps Giovanna Snowflake
Sizzix/Hero arts die cut snowman.. Tree
Poppy Stamps Poinsettia
Impression Obsession pine bows.
Sizzix  embossing folders Sugar and stary Night
Aged Mahogany Distress Ink
Aged Spruce Distress Ink
Pearls eva Creative
Score board.
Memories White die ink
edge scissors


I started by Cutting the designer paper  12 X 4… and scoring every 4  inches.. Then cutting folding the paper in the first 4 inches and last four inches and cutting at an angle.
The center piece was embossed and  is in a rectangle shape about 3 3/4 x 6 inches.
Then I embossed and inked the tags.
The ribbon is taped down on the angle pieces.
and the snowflake is made of two snowflakes.
All the paper and dies can be found a  great store in Co  called a Scrap N Place.
Thank you for stopping by

Debbie,,

Wednesday, November 13, 2013

A Frosty Christmas


Today's Card is another fun snowman card… made with some great items all found at A Scrap N Place in Colorado.. I sure wish I lived closer to this store… I know I would love it there.
Supplies 
Dies
Memory Box Frostyville Frame
Memory Box Debutante Frame
Cheery Lynn Merry Christmas
Sizzix/Hero Arts snowman die set
Memento Black ink
Sizzix embossing folder Sugar and Stary Night  657066
White Memories dye ink
Bling
Aged Mahogany Distress Ink
red Ribbon
white paper
red paper
Copic markers

I started by cutting the debutant die out of red paper and then embossing it in the Stary Night embossing folder… then I highlighted this with the white Memories die ink..
Then I took a piece of white paper and embossed it twice because I wanted a size bigger then the embossing folder and highlighted this piece with Aged mahogany.
Then I cut out the Frostyville Frame in white and glued it on top of the red piece..
Thanks for stopping by
Debbie

Wednesday, November 6, 2013

A Merry Snowman


Today's card is another snowman … but you all know I just love these guys… I used a sketch I saw posted on a yahoo group… because I loved the layout.. and of course I mage some of my own changes..
Supplies
Designer paper
red paper
cream paper
White paper
Dies
Spellbinders  Labels 4
Cheery Lynn Merry Christmas
Cheery Lynn small snowflake
Memory Box Macarena corner
Poppy stamp Giovanna Snowflake
Sizzix/hero Arts die cut snow man
Pearls Eva Creative
Green Ribbon
Copic markers
and all this can be found at A Scrap N Place.. an awesome store in Colorado.

I started by using a tag and as a template for my tag.  and layering this on green snowflake paper.. then I cut the dies… and the rest is history.
Thanks for stopping by
Debbie 

Wednesday, October 23, 2013

Winter Wonderland

Today's card for Scrap n Place is another fun Christmas card.. and I just love snowmen.. the Die set  is just to cute and can be used so many different ways.
Supplies
sizzix stamp and Die cut set
copic markers
pearl paint ranger
stickles ranger
memento black ink
Distress ink Iced Spruce.
glitter pen clear
Paper
Red, white Green
Designer paper
dies
Spellbinders 2013 Snowflake pendant
Memory box frosty border 98171
Lea'bilities holly frame
dries clear glue
red bling
green ribbon

The card was made by just cutting the dies and adding the glitter pen to the snowman and flakes to add a little bling.. then just layered the way I wanted it to go.. the  holly frame to do the two different colors you just need to cut twice.. easy ... the longest part was letting your liquids dry..
this set is great for production stamping because it does not take long to color.. which speeds up the process.
thanks for stopping by Debbie

Wednesday, October 16, 2013

A snowman's Joy


Today's card for A Scrap N Place in CO is a simple card.. with snowmen.. got to love the snowmen.  
Supplies

Sizzix Stamp And Die Snowman set 657781
Stripped ribbon
Copic markers
Memory Box. Snowflake Corner
Joy creative box 
Eva Creative Red bling
Pop up dots. Dries clear adhesive
red, white and green paper
Memento Black ink
Fired Brick Distress ink
Pine needles Distress ink
Bundled Sage Distress ink
Ice Spruce Distress ink

I decided to do a quick background technique..with the tree stamp in the set.  I stamped the trees randomly on the white cardstock in 3 different shades of green.. making sure I stamped off the edge of the paper. 
then I stamped the snowmen and colored them the center one was mounted with pop up dots.. I stamped the tag in red and and word Joy in green and added a ribbon...
This would make a great production card for Christmas..
thanks
Debbie 

Wednesday, October 2, 2013

Snowman Shadow Box Card


oday's Card for A Scrap N  Place in CO  is a shadow box card.  I had a person tell me these are not to hard to do.. this is a very simple one.. One of these days I will try a more fancy one.
Supplies
Sizzix/Hero Arts snowman set
Copic markers
Memento Black ink
Eva Creative red bling
Stickles Distress Fried Brick
Pop up Dots,
Dries Clear adhesive
Encore Pigment ink Green
Embossing clear powder
designer paper
Cream , white, green paper
Dies
Memory Box snowflake corner
Memory Box Frost;y Border
Memory Box Mittens 98663
Spellbinders Floral Doily Motifs 
Joy Crafts Bow 600210065
Cheery Lynn Holly Corner B184

I started by  cutting a piece of designer paper and cream paper in a 6 X6 piece and scoring it at 1/2 inch on both ends.. Then I did this with the cream paper.
I used the Spellbinder die to cut the hole in the center.. and then used the same piece to mount under the snowman and tree..  I glued the Snowflake corner on the inside of the designer paper to give the look a more layered look.. Then I just added some dies.. where I wanted and taped the two pieces together.
Thanks for stopping by 
Debbie 

Wednesday, September 25, 2013

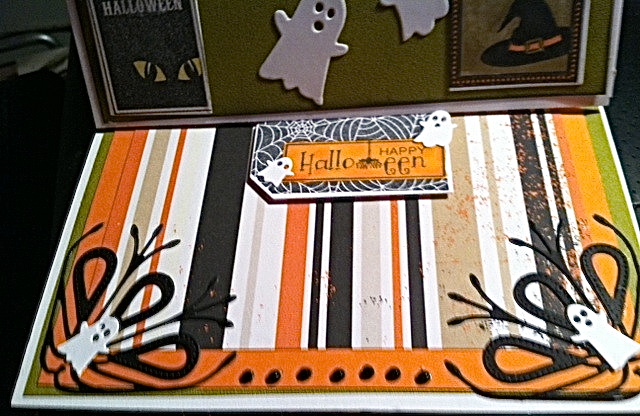
A Haunted Easel Card


View of full card
close up of card front
close up of bottom


Supply list
Taylored Expressions Totally Tags Halloween
Taylored Expressions Totally Tags Dies
Say it with Bling black Rhinestones Want 2 Scrap
Memento Black Ink
Pierson Corner 98678 Memory Box
Ghastly Ghosts 98750 Memory Box
Ghost Trio 98376 Memory Box
Color Box Chalk Charcoal
Dries clear adhesive
Gelly Roll pen Clear Star
Copic markers
Mounting tape
Orange, White, green and  Designer paper
green Ribbon.

To make a 6 x 6 easel card you start with a piece of paper 12  X 6.  Then you score it at 6  and 8 inches  the long way..  you do a valley fold at 6   inches and a mountain fold at 8.
You will also need a piece of  6 X 6 card stock for you base.. I do all my work on my base piece before mounting  the card portion on my easel part..
I also do the bottom .. except for the piece that is going to hold the easel. After I put the piece on the easel portion of the card.. then I add the part that is going to hold the easel up.
thanks for stopping by .. You can pick up all the supplies for this card at A "Scrapin" Place
Debbie

Wednesday, September 11, 2013

Halloween's a Hoot


Today's card was made using some great distress looking designer paper and the fun Halloween Tags from Taylored Expression.
The supply list for this card is
Riviera Corner 98372 Memory Box
Macarena corner 98291 Memory Box
Say it with Bling Black from want to Scrap
Taylored Expressions Totally Tags dies
Taylored Expressions Totally Tags Halloween
Memento Tuxedo Black ink
Designer paper
Orange, Black and white paper
Copic markers
dries clear adhesive

I started by layering my paper onto my card black.. then  cutting out the window.  Then stamping
on the white paper   so I could line my image up with the window. Then I added some gems to hide the extra placement holes made by the die.  Then I layered the swirls and glued them in place.. and of course I added some bling.
Make sure you stop by A Scrapin place and get your fun items to make your Halloween cards.
Thanks for stopping by
Debbie

Wednesday, September 4, 2013

Happy Halloween


Today my card was made using some fun Stamps and dies by Taylored Expressions,  the stamps and dies are made to match so you can always get a good cut on your cut out images.  When you use these you want to make a templet first and line it up with your stamped image.. I used some removable tape to hold it in place.
The products used for this card are
Savannah Border 98221 by Memory Box
Madera Corner 98221 by Memory Box
Purple, orange, white and black paper
Taylored Expressions Totally Tags Halloween
Taylored Expressions Taylored dies.
Eclipse embossing powder by  Powder Kegs
Versa Mark ink
Color Box Chalk Charcol
dries clear glue
Black Ribbon
Bling
mounting tape.
I started by stamping on  white paper with Versa Mark ink,  and putting embossing powder on the ink and heat setting then cutting the images out.  When you put the templet over the top.. make sure you use some removable tape to hold the dies and the templet in place. .

Thanks for stopping by ...
Debbie