Showing posts with label Kim. Show all posts

Saturday, February 14, 2015

Happy Valentine's Day

Happy Valentine's Day!!! I hope you all have a fun filled day. I made this card by embossing the little hearts using Provo Craft's embossing folder. I then cut out Cupid and matted him onto the sentiment label. The satin ribbon is tied with a double bow and accented with a floral die-namic rose and Melissa Frances pearl.


Saturday, February 7, 2015

Love

Hi There! Kim here to share with you another fun Valentine's Day card. I love embossing on paper. It creates a beautiful texture to jazz up any project.  This is one of those 10 minute cards. The beautiful background paper is all the sentiment I need for this all occasion look. The white and red cardstocks were embossed with various embossing folders and then freehand cut and adhered with 3-D foam tape.  


Supplies can be found at A Scrap 'N Place:

Papers: Hampton Art (Jillibean Soup), white and red cardstock
Accessories: Want 2 Scrap (red rhinestone), red twine, organza ribbon
Tools: Provo Craft ( Swiss Dots and Large dots embossing folder), Elizabeth Craft Designs (embossing folder)

Saturday, January 24, 2015

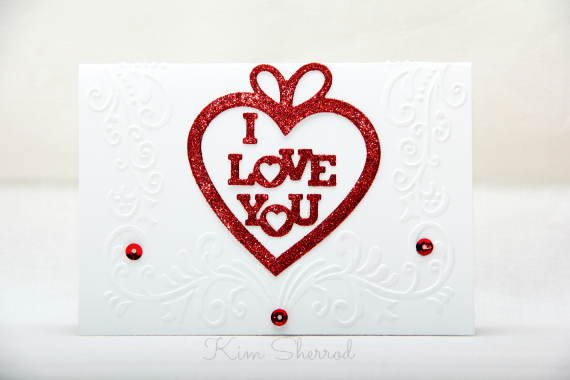
I Love You

Hi There! This is Kim here to share with you this CAS card uses simple dies and embossing to create an elegant and quick card.  First off I used Ectasy Crafts framed embossing folder then I used Impression Obsessions dies to cut out the heart and sentiment. I love the red glitter paper that's used for the dies. It adds a beautiful shimmer to the card. Last are some little red sequins to embellish the embossed areas.


All supplies can be found at A Scrap 'N Place:

Papers: White cardstock, Red Glitter cardstock
Accessories: Red Sequins
Tools: IO Dies (Heart #DIE31-K), Ecstasy Crafts Inc. (Embossing Folder #EFC1001)

Saturday, January 17, 2015

I Love You!

Hi There! This is Kim here to share a fun Valentiine's Day card. Nothing says Valentine like Cupid's arrow. This is another quick and easy card to make.I start off by embossing the white cardstock with tiny little hearts. I then die cut Cupid and the frame. Cupid is adhered to the frame using 3-D tape. The ribbon adds a nice shimmery touch and accented with a heart brad. To finish it off I stamped the sentiment onto white cardstock and rounded the corners with a corner rounder.


Supplies can be purchased at A Scrap 'N Place:

Stamps: Fun 'n Flair Stamps (It's All About Love)
Papers: Hampton Art (Jillibean Soup), White Cardstock
Accessories: Organza ribbon with Silver Glitter Trim, Silver Heart Brad
Tools: QuicKutz (Cupid die), MFT (Oval Doily die), Provo Craft (heart embossing folder)

Saturday, November 8, 2014

Jingle All The Way

Hello Stampers! This is a quick CAS Christmas card to create. I used a Penny Black ornament die to cut out the ornament shape. I then added rhinestones to accent it. The cream cardstock is stitched using a zigzag stitch then I stamped the sentiment and added the strings to pull it all together.


Saturday, November 1, 2014

Happy Holidays

Happy Saturday! Kim here with another quick Christmas card. I embossed the red cardstock and matted it onto a shimmery black cardstock.
I used the Christmas ornament dies from Penny Black to cut out the shapes. I then used gray paint for the base then went over it with stickles. The ornaments are adhered to the card using 3-D foam tape.


Saturday, October 25, 2014

Christmas Tag Book

Happy Weekend! This is Kim. I hope you're off to a wonderful start. Today I have a Christmas tag book to share. I used glitter paper for the cover and accents for the book. The sleeve was added to keep the book closed.

The inside is done using  a combination of embellishments and accented with a Sweet 'n Sassy scallop die.


Love these tags. They make a nice gift set.


Saturday, September 27, 2014

Broomstick Parking Only

Happy Saturday! This is the rest of my Halloween cards for this month. It has been fun creating them!  I used some fun patterned papers from Authentique for the background. I then matted the orange striped paper with black cardstock. I love the raffia ribbon. I unrolled a portion of it to create the bow and I also did some distressing on the sentiment portion.


All supplies can be purchased at A Scrap 'N Place.

Supplies:
Papers: Canvas Corp (Haunt It Sampler on White), Authentique (Enchanted collection), black cardstock
Inks: black
Accessories: black organza ribbon, orange raffia ribbon

Saturday, September 20, 2014

Under Your Spell

Happy Saturday! This is a super quick Halloween card to make using pre-made shapes and sentiments. I rounded the corners of the textured cardstock. Added the orange net ribbon and some brads. The sentiment is then added on to the top using 3-D foam tape.


All supplies can be purchased at A Scrap 'N Place.

Supplies:

Papers: Orange cardstock, Bazzill (yellow cardstock), Canvas Corp (Haunt It Sampler on White)
Inks: Copic (orange marker)
Accessories: Orange Brads

Saturday, September 13, 2014

Frightfully Sweet

Happy Saturday! I love creating backgrounds using stamps so on this Halloween card I used white cardstock and randomly stamped the background with sentiments and a skull. I then distressed it with orange ink. I love the ribbon raffia. I unrolled some of it to make my double bow then added another strand for the center to hold the bows together. I stamped the sentiment and used 3-D foam tape to give it some dimension.


All supplies can be purchased at A Scrap 'N Place.

Supplies:
Stamps: MFT (Spooky Sentiments)
Inks: Orange and black
Papers: Canvas Corp (Candy Cane on White), white and black cardstock
Accessories: orange raffia ribbon

Saturday, September 6, 2014

If You've Got It

Hi There! Kim here to share with you a fun Halloween card. Fall will be here soon  and that means it's time to get ready for some spook-tacular fun. I put this together with a combination of embossing and die cutting to add texture and dimension. I added the brad on top of the bow and the rhinestones accent the die cut scallop. 


You can find all supplies used at A Scrap 'N Place.

Supplies:
Papers: Canvas Corp (Haunt It Sampler on White, Candy Corn on White), Orange and Black Cardstock, Authentique (Enchanted) 
Tools: Elizabeth Craft Designs (Damask embossing folder)
Accessories: Black rhinestones, orange checkered ribbon

Saturday, June 28, 2014

Snowman Winter

Hi There! Kim here with one last card for June. What a fun month this has been creating Christmas cards. For this card, I used Basic Grey's Figgy Pudding paper with the snowman and fussy cut them. I also freehand cut the white glitter paper to resemble snow and using 3-D foam tape to adhere the paper and snowmen onto the blue Bazzill cardstock. The snowflakes were die cut from Sweet 'n Sassy Stamps' Snowflake die set. Last is the brown ribbon to finish off the card.
All products used can be purchased at A Scrap 'N Place.


Saturday, June 21, 2014

Christmas Snowflakes

Hi There! Kim here with another fun Christmas card using Sweet 'n Sassy Stamps' Snowflake die set. I rounded the bottom corners of the papers using a corner rounder. I then die cut the snowflakes using the white glitter paper and red cardstock. These two snowflakes are then stacked on top of each other using 3-D foam tape and the red star in the center. Last is to add the silver spiral clip and green organza ribbon.


All supplies can be purchased at A Scrap 'N Place.
Papers: Bazzill (red textured cardstock), Basic Grey (Figgy Pudding), White Glitter cardstock, red cardstock
Accessories: Silver Spiral Clip, Green Organza Ribbon
Tools: Sweet 'n Sassy Stamps (Snowflake die set)

Saturday, June 14, 2014

Merry Christmas

Hi There! Kim here with a quick and fun Christmas card using the snowflake dies from Sweet 'n Sassy Stamps as a focal point. I distressed the kraft cardstock with white ink. The snowflake dies are layered using 3-D foam tape and a brad is then added to the center. The banner is done freehand then distressed also.


All supplies can be purchased at A Scrap 'N Place.

Papers: Bo Bunny (Woodland Winter), Kraft cardstock, White cardstock
Accessories: Silver Brad, Snowman charm
Inks: white, black
Tools: Sweet 'n Sassy Stamps (snowflake die set)

Saturday, June 7, 2014

Coolest Christmas

Hi There! Kim here with this cool Christmas card. I did a negative die cut by running the snowflake die through the white glitter cardstock and only using the open cut out part. I then layered some more snowflakes onto the center of the negative cutout. The banner is done freehand and placed on top of the snowman paper using 3-D foam tape. I also added some silver dot sparklers from Stampendous.


All supplies can be purchased as A Scrap 'N Place.

Papers: Basic Grey (Figgy Pudding), Bazzill (red & green cardstock), White Glitter Paper, White Cardstock
Accessories: Stampendous (dot sparkler silver)
Tools: Sweet 'n Sassy Stamps (snowflake die set)


Saturday, May 31, 2014

Winter Kisses

Hi There! Kim here with a Christmas card to kick off Christmas in June. What a way fun to get a head start on your Christmas cards. I created a quick card using Sweet 'n Sassy Stamps' snowflake die for the main focus. I popped the snowflake up using 3-d foam tape. The snowman paper and blue cardstock was distressed with distressing ink. The twine is then added to finish the card.


All supplies can be purchased at A Scrap 'N Place:

Inks: Tim Holtz Distressing Ink, Black ink
Papers: Glitter White Cardstock, Brown Cardstock, Bazzill green textured Cardstock, Blue Cardstock
Accessories: The Twinery Green and white twine
Tools: Sweet 'n Sassy Stamps Snowflake die set

Saturday, May 24, 2014

Thank You

Hi There! What a beautiful and simple way to tell that someone special Thank You. I created the music background using Darice's Music Sheet embossing folder. I then stamped the sentiment onto the cream cardstock and matted it onto the patterned paper and black background using 3-D foam tape. The bow is then tied using black organza ribbon and a clear rhinestone added to the center. I colored the rhinestone using a light brown Copic marker.


Supplies:
Stamps: MFP (Mother's Day)
Papers: Bazzill (black), cream cardstock, Authentique (Abroad Voyage)
Inks: Copic, Memento Tuxedo Black
Accessories: Zva Creative (rhinestones), black organza ribbon
Tools: Darice (Music Sheet)

Saturday, May 17, 2014

World Traveler

Hi There! Today's card features this beautiful world map paper from Authentique paired with Simple Stories brown plaid paper. I die cut the square scallop using Spellbinders' Nestabilities. The brown plaid was freehand cut. I also did the compass by hand. I cut the background paper into 1 x 1/2" strips then cut again to form triangles. I then glued the triangles together to form a mariner's compass. It is popped onto the cream cardstock using 3-D foam tape. The numbers are from a strip of the Authentique Abroad Voyage paper. I added some stitching to finish the card. This would be a wonderful masculine card for Father's Day.


Supplies:
Papers: Authentique (Abroad Voyage), Simple Stories (Generation)
Inks: Rangers Distressing ink
Accessories: brad?
Tools: Spellbinders (Square Scalloped Nestabilities)

Saturday, May 10, 2014

Congrats

Hi There! This is Kim with another quick masculine card to get you ready for graduation and Father's Day coming up. This a larger stamp than I am used to, but it stamps beautifully. The stamp is from C Thru the Woods. I colored this guy in using Copic markers and used the blender marker to soften some of the ink.
I then used a corner rounder for the corner of the cardstock. The image and sentiment is popped onto the card using 3-D foam tape. Last is the ribbon. This is a quick card you can whip up for any occasion.


Supplies: (all supplies can be purchased at A Scrap 'N Place)

Stamps: C Thru the Woods
Papers: Authentique (Suave), Navy cardstock, White cardstock
Inks: Copic, Black 
Accessories: Brown ribbon


Saturday, May 3, 2014

Happy Birthday

Hi Stampers! Happy Saturday! Kim here to share with you a masculine birthday card. I made the bow tie using Simple Stories patterned paper. I created the accordion fold then wrapped 3/8" ribbon around the center. I used a glue gun to keep the ribbon together. I freehand cut the banner with the birthday sentiment then added a couple of rhinestones to it. The rhinestones were colored in using a brown Copic marker. I created the embossing line on the brown paper using an embossing stylus and ruler. This would make a wonderful Father's Day card. All you need to do is switch out the sentiment.


Supplies can be found at A Scrap 'N Place:

Papers: Simple Stories (Generations Together), Cream & Brown Cardstock)
Inks: Rangers (brown & black ink), Copic
Accessories: Zva Creative (rhinestones), brown 3/8" ribbon
Tools: Spellbinders ( Nestabilities), Glue Gun, embossing stylus